Adding a Custom Font to Your Site
Your website is one of the most important marketing tools for your business. This is where we get to show off your brand's personality and show how you differentiate from your competition! Sometimes, that means adding in a custom font not found in Squarespace's library. But fear not--adding custom fonts to your website is easy!
What fonts does Squarespace have?
Squarespace includes 600 Google fonts and 1,000 Adobe Fonts, and even more not from those libraries. To see the complete list, head to your Site Styles, click Fonts, and select one of your font groupings. (Headings, Paragraphs, etc.) From there you can click on the font used and scroll through Squarespace's massive collection. To quickly search for a specific font, use the search bar at the top of the list.
How do I add my custom font?
1. Upload the File
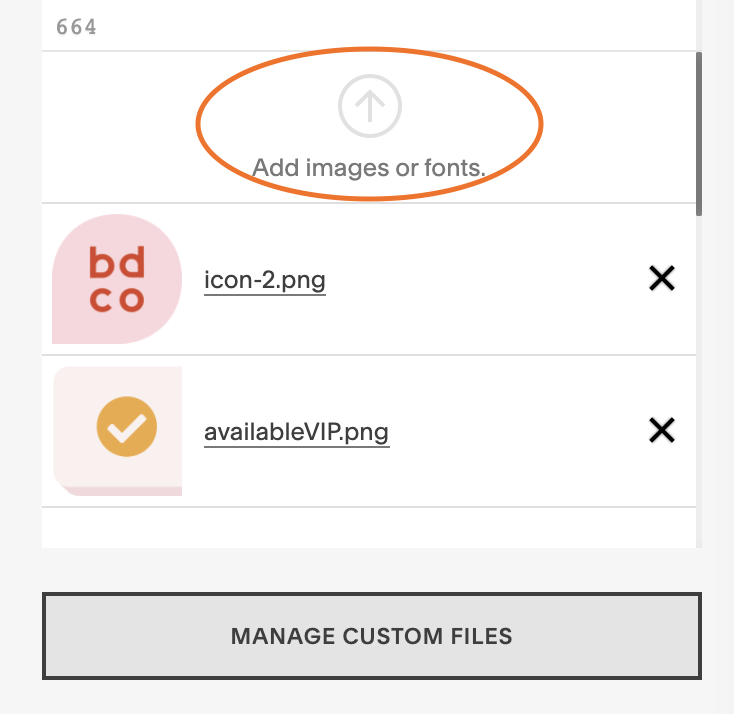
The first thing we need to do is upload the actual font file. Head to Website > Website Tools > Custom CSS > Custom Files. Click on "Add images or fonts." to select the font file from your computer. This should be a .ttf or .otf file.
2. Copy & Paste the Code
Now in the CSS area below the Custom Files button, paste in this code:
@font-face{
  src: url( );
  font-family: 'FONT NAME';
}
Now click to place your cursor in between the two parenthesis. Click Custom Files again, and select the font you uploaded. A link to your font should automatically generate between those parenthesis.
Then where it says FONT NAME, enter the name of your font, making sure to leave the '' marks where they are. This name is really for your use only, so you can shorten it or make it a single word to make things simple if you'd like.
3. Set the Heading Style
Now that we have the font uploaded to your website and we've assigned a name to it, we need to tell the website which heading style we want to appear as that font.
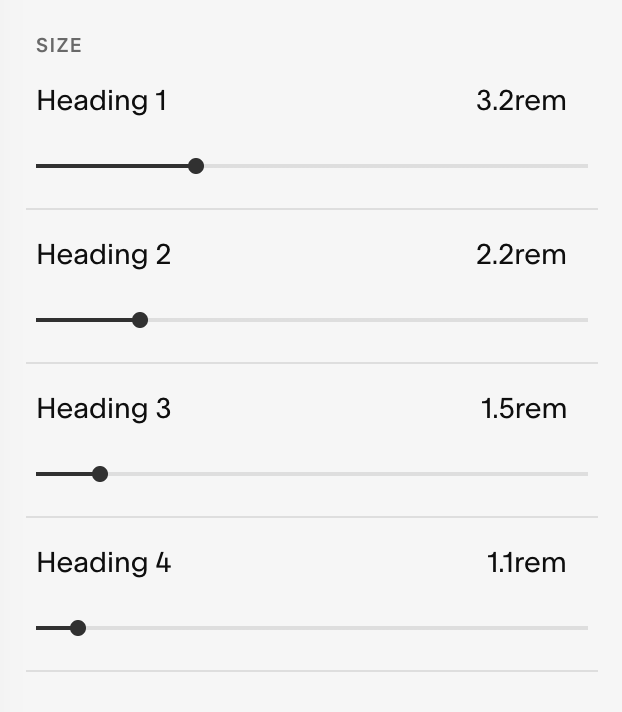
Squarespace 7.1 has 4 heading options: Heading 1 - Heading 4. If you're using Squarespace 7.0, you'll only have Headings 1 - 3. (Fun fact: In the web design world Headings 5 - 7 also exist, but to keep it simple Squarespace only uses 4.)
These headings are represented in code as h1, h2, h3, h4, and so on.
Under the code you just pasted and tweaked, copy and paste in this code:
h1 {
  font-family: 'FONT NAME';
}
Obviously you'll replace the FONT NAME again, but make sure it's exactly like how you typed it in the first section. This is what assigns the heading style to the font, so it has to match what you entered in the first part perfectly.
Then the last thing you'll need to do is change that "h1" to whatever heading style you want! Again, it can be h1, h2, or h3 (or h4 for Squarespace 7.1 users).
Now you should see the font on your site! You can repeat this process with as many fonts as you’d like (as long as they’re all different heading styles of course).
***Don’t forget to press save!! (top left)
4. Change the Size & color
Depending on what kind of font you uploaded, you might want to adjust the size. Squarespace doesn’t allow a ton of customization in between your different headings, but we can edit each heading style’s individual size!
After saving your CSS customizations, head back out to the Design menu and select Site Styles. Select Fonts and then Headings. Under the “size” section you can adjust each of the 4 heading sizes individually.
To change your heading’s color, you’ll have to go to the color theme editor and change the heading style color there—just like you normally would!
5. BONUS Customizations
Okay, so you just added your new font… but you normally use it in all caps. Or you want to add more letter-spacing.
If you’re feeling brave and want to add some further customizations, here’s some more CSS parameters you can add. After the semicolon of the “font-family” line, hit the return to start a new line. You can use any of these (and more!) to continue customizing your font:
h1{
  font-family: 'FONT NAME';
  font-weight: 300; /* to make bolder or thinner - numbers go by 100s starting with 100 to 900 */
  text-transform: uppercase; /* options: uppercase, lowercase, capitalize */
  letter-spacing: .1em; /* spacing between letters */
  line-height: 1.2em; /* spacing between lines */
}
I hope this helps you style your site and show off your amazing brand’s personality!